How To Configure Bandwidth Control on TP-Link Router
Why is Bandwidth Control necessary?
All machines on a typical home network share the same amount of bandwidth. This implies that any computer running high-bandwidth software, such as torrent clients or other P2P programmes, will have an impact on the other computers. This could also have a detrimental effect on how well the network as a whole performs. How do we prevent this?
The solution is bandwidth control, which is intended to reduce the effects while the link is experiencing high traffic. We can assign a precise minimum or maximum bandwidth for each computer using Bandwidth Control, reducing cross-computer interference. To configure this functionality, please follow the instructions below.
How is Bandwidth Control configured?
The example scenario that follows will show how to use bandwidth control to optimise the load using three computers sharing 512 Kbps Egress Bandwidth and 4 Mbps Ingress Bandwidth.
Example:
- PC1 frequently plays online games and downloads files, both of which consume the majority of available bandwidth.
- When watching movies online, which also requires a lot of bandwidth, PC2 is employed.
- PC3 only requires a little amount of bandwidth because it is typically used for web browsing.
To set up Bandwidth Control TP Link, please log in to the web administration portal.
Step 1:
Open a web browser and enter the default address, such as: http://tplinkwifi.net
Please refer to the product's bottom label to find the default access.
Step 2:
Fill up the login page with your username and password. Both the default username and password are lowercase versions of admin.
Step 3:
In the left menu, select Bandwidth Control-Control Settings.
Reminder: If you have an ADSL modem, for instance, select "ADSL" under line type. Please ask your ISP what line type you have access to if you are unsure how to select the line type.
The true bandwidth provided by your ISP should be used for both the ingress and egress. (1Mbps=1024Kbps)
Step 4:
To save the settings, click Save.
Step 5:
On the left page, click Bandwidth Control -> Rules List to view and edit the rules.
Step 6:
To add a new rule, click Add New.
IP Range: a single IP address or a range of IP addresses. When a single IP address is configured, the computer associated with it will receive a dedicated amount of bandwidth. All of the computers in the configured IP address range will share the available bandwidth.
Port Range: The TCP or UDP protocol's port configuration.
Protocol: You have a choice between the TCP and UDP protocols, or you can use both.
The maximum and minimum upload speeds across the WAN port, with a default value of 0, are known as egress bandwidth.
The maximum and minimum download speeds through the WAN port, with a default value of 0, is known as ingress bandwidth.
Step 7:
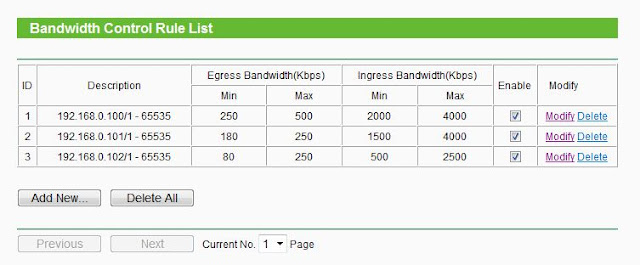
Following are some possible bandwidth allocations based on client demand.
According to the guidelines, the maximum bandwidth can guarantee that PC1 and PC2 will consume all available bandwidth when using the Internet alone, and the minimum bandwidth can guarantee that they will have enough bandwidth when using several PCs at once.
Note: The Egress Bandwidth and Ingress Bandwidth that you configure on the Bandwidth Control settings page should be smaller than the Min Egress Bandwidth and Min Ingress Bandwidth that you configure.
Step 8:
To make changes take effect, enable the bandwidth control and click the Save button on the Bandwidth Control Settings page.


Comments
Post a Comment